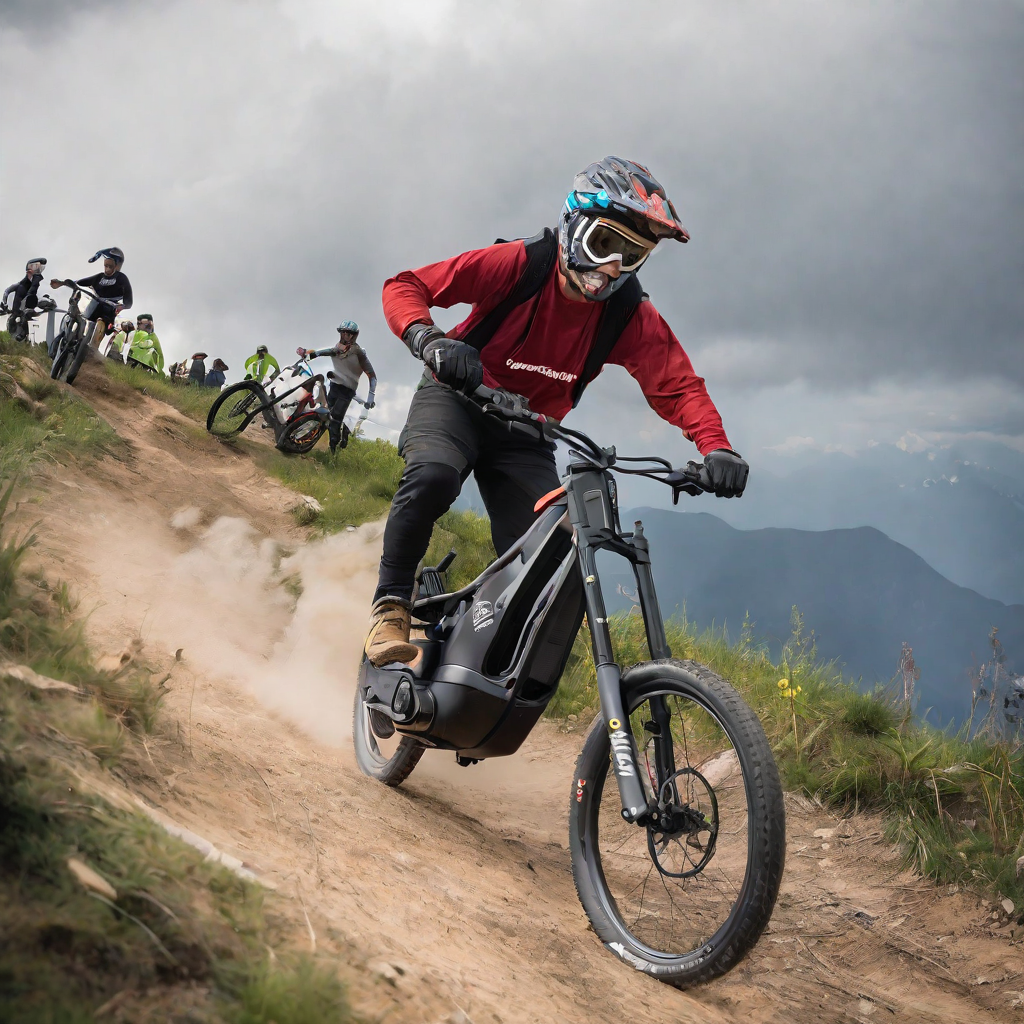
Tips and Techniques for Riding Electric Downhill Mountain Bikes
| Key Takeaways |
|---|
|
Electric downhill mountain bikes (eDH bikes) deliver an adrenaline pumping riding experience. But conquering steep, gnarly descents on an eMTB requires honing specific techniques to manage the high speeds and hold your line through rough terrain.
In this guide, we’ll provide tips on body position, braking, weight shifting and bike handling to keep your eDH bike under control and shore down trails with confidence. Master the methods shared here to expand your downhill prowess.
Overview of eDH Bike Handling Challenges
While thrilling, piloting a 15-20 lb heavier eMTB with extra power down steep grades poses challenges:
- Managing Momentum – Higher top speeds require prudence to avoid losing control. Braking technique is key.
- Preventing Bucking – The low center of gravity can cause compressions to spring the bike up if not centered properly.
- Reduced Maneuverability – Heavier eMTBs require more muscle and timing to whip around tight bends or dodge obstacles.
- Suspension Impact – Long travel suspension can pack down if geo is off, reducing traction. Requires tuning and adjustments.
- Cornering Precision – The front wheel on eMTBs doesn’t dart into turns as crisply. Lines must be precise.
But mastering adapted body positioning, braking cadence, and handling nuance will allow an eDH bike to fly with control.
Maintain a Low, Centered Body Position
Staying low and keeping your weight centered makes balancing the extra mass of an eMTB easier through chunky terrain and at speed.
Keep Your Hips Back
Position your hips rearward towards the saddle, keeping weight anchored low on technical sections. Avoid shifting forward as this compounds bucking forces through hits.
Use Your Legs as Shock Absorbers
Allow your legs to compress as natural cushions by never fully locking your knees. This stabilized the chassis absorbing forces.
Keep Elbows Wide
Pointing your elbows laterally rather than pointed rearward helps keep shoulders and core muscles engaged for stability. Wider positioning also allows better bike movement independence.
Stay Low on Steep Grades
Descending very steep sections, keep your chest low to the handlebars to move overall rider mass rearward for front wheel traction.
Relax Your Grip
Avoid fixating your hands in a death grip. Let the bike move beneath you. Loose hands help isolate bike feedback from upper body forces.
With practice, an athletic ready position will let the eDH bike move while your body remains poised and balanced.
Modulated Braking Technique
Finesse your speed control applying brakes gradually with an eMTB:
Avoid Grabbing All Brakes at Once
Hard simultaneous front and rear braking can pitch you over the bars as weight transfers abruptly forward. Grip should ramp up progressively.
Drag Rear Brake Through Corners
Gently dragging the rear brake through a turn can help settle the rear suspension, increasing traction. But stay smooth to prevent skidding.
Alternate Front and Rear Braking
Moderating front then rear brake in cadence helps keep the chassis stabilized preventing sudden dips under the increased mass.
Stay Off Brakes Before Obstacles
Let momentum help carry an eMTB through rock gardens and chunk. Use brakes to scrub speed after clearing sections. Grabbing brakes can compress the bike down when needing float.
Allow Straight Line Speed Scrubs
Look ahead for shorter slopes between technical sections to let off the brakes and gently brake in a straight line. This prevents entering corners or obstacles too slowly.
Finesse and cadence eliminates harsh compressions and maintains momentum ideal for rugged conditions. Stay smooth.
Weight Shift Techniques for Traction
Proper weight distribution maintains front wheel grip and contact through obstacles:
Press Front Tire Into the Trail
When encountering roots, rocks and holes, push your chest down keeping shoulders wide while pressing the front tire into the trail. This prevents deflection off obstacles and potential washouts.
Drive Your Weight Into the Pedals Before Drops
As you approach a sharp drop, drive your weight into the pedals while simultaneously pushing the front tire forward. This provides front stability pointing down transition drops.
Move Hips Rearward Before Big Hits
Anticipating big impacts from jumps or drops, shift hips rearward so you don’t go overweight the front wheel on compression. Let the rear suspension handle forces.
Don’t Pull Bars to Manual
Avoid yanking upward on the handlebars through dips and G-outs. Let the eMTB suspension system absorb forces while your arms stay light and active.
Let Rear Wheel Leave the Ground
If hitting an extremely steep section, lighten your grip allowing the rear to rise while your body remains forward and low to keep front tire planted.
Make your weight shifts gradual, timed to terrain challenges. Avoid reactions that compromise stability.
Situational Bike Handling Techniques
In addition to proper body positioning, master these nuanced bike handling skills:
Crouch Through Tight Spots
When navigating very narrow or technical lines between trees and rocks, get as low as possible bringing your shoulders narrow to fit your body through.
Let Front Tire Roll Over and Through
Allowing the front tire to roll up, over and through obstacles pulls the bike forward maintaining momentum. Avoid prematurely pulling the front up.
Brace Your Outside Knee Through Corners
Driving your outside knee against the top tube when cornering hard braces your body stable allowing the bike to lean and handle forces beneath you.
Look Through the Exit
Spot your exit line before entering a turn rather than fixating on obstacles mid corner. Let your peripheral vision judge cornering clearance.
Carry Momentum Through Rough Patches
Scan ahead and note sections allowing you to let off the brakes and carry speed. Pump areas where you can to maintain energy for technical spots.
With mileage, handling the eDH bike will start to feel intuitive. But stay focused and proactive reading the trail.
Master Speed Control on Steep Terrain
Controlling speed on extremely steep grades takes added caution with the extra momentum of an eMTB.
Resist Grabbing Fistfuls of Brakes
Stay smooth, easing off the brakes between obstacle patches. Heat buildup can lead to fade lower down long descents if overused at the top.
Use Terrain Features to Scrub Speed
Allow sidehilling sections, natural berms and other features to dissipate speed when possible rather than heavy braking that saps energy.
Rotate Wide if Overcooking a Corner
If you blow the entrance speed of a corner, straighten the bars allowing the rear end to rotate around rather than risk washing out on overly sharp lean angles.
Use Your Dropper Post
Lower your saddle via the dropper before steep sections so you can get your weight behind the saddle and low when needed.
Shed Speed Before Off-Camber
Sections of trail angled sideways necessitate lower speeds. Bleed speed earlier before beginning off-camber to allow cleanly negotiating these falls hazards.
Finesse, looking ahead, and smart energy management will keep steep terrain under control. Avoid braking reactions leading to mismatches of momentum and trail features.
Body Armor and Protection for eDH Riding
The higher speeds and consequences of errors downhill riding necessitate wearing key protective gear:
- Full-face helmet – Provides complete head and face protection in crashes. Look for MIPS safety technology integration.
- Knee pads – Sliding crashes are common. Quality pads with trail-ready fit allow pedaling freely unencumbered.
- Neck brace – Limits overextension of the neck and spinal column during violent crashes. Look for EVS and Leatt models.
- Arm guards – Optional for some, but provide abrasion protection from shoulder to wrist for riders prone to falls.
- Torso armor – Chest and back plates are available for maximum protection on ultra-rowdy trails. Bulkier but offer peace of mind.
Don’t neglect protective gear just because eMTBs may allow riding beyond your technical limit. Focus on the fundamentals and let armor cover any misjudgments.
Customizing Your eDH Bike for Descents
Downhill performance can be enhanced through components:
- 200mm rotor 4-piston brakes – Maximum power and heat dissipation for sustained braking. Look for enduro-specific options.
- Downhill casing tires – Reinforced sidewalls resist pinch flats and rim hits when tracking through rock gardens. Prioritize durability over weight.
- Wide riser bars – 780-820mm bars offer additional leverage and control when muscling through technical steeps.
- Shorter stem – Reducing stem length to 30-50mm makes weight shifts faster reacting and steering snappier.
- Grippy lock-on grips – Ensure hands stay firmly in place despite vibration and varied terrain.
Purpose built downhill eMTB parts complement honed skills for confident speed management in the steepest, rowdiest terrain.
Conclusion
Electric bikes allow conquering downhill trails like never before, but require honing techniques to manage the high speeds and moderate the weight through rough terrain. Staying centered, brake modulation, smart line choices and practice will allow shoring down steeps with control. Add armor to push your limits safely. Master the nuance and a whole new world of descents open up!
eDH Riding FAQs
Should I disable the motor when downhill riding?
Depends on your skill. Throttle use requires prudence. Better to focus on skills without assist until deeply ingrained.
Do eMTBs need a chairlift to shuttle climbs?
No, the motor provides uphill assist between descents. But some bike parks offer eMTB uplift access to avoid complete climbs when you just want downhill laps.
What travel fork is ideal for most eMTB descents?
150-170mm lets a fork absorb big hits while retaining some pedaling efficiency for all around trail capability. Go bigger if only shuttling bike parks.
Are eMTBs allowed at lift-access bike parks?
Policies vary. Some permit eMTBs with restrictions, others still prohibit electrics. Reach out to confirm before assuming eMTB access.
Should I upgrade brakes on a new eMTB?
Not always mandatory, but 180-220mm rotors and metallic pads improve heat capacity for high alpine descents. Larger 4-piston calipers also help.